Introduction
When you’re adventuring/surviving in the bitter cold, every second matters. In -11°F weather, hypothermia sets in within minutes, and death can occur within an hour. On an average January day in Warroad, Minnesota, the temperature is 2.6°F, providing the ideal environment to test out Beyond’s latest cold weather systems including the (Bask Pullover, Bask Long Johns, Ascent-Glide Pants, Anchor Belay) and a plethora of other specialized gear for our Extreme Cold Weather (ECW) customers. (ArcticGate Parka Prototype, Mountain Jager Jacket, Warmfoot Overboot(s), NewWinter Neck Tube(s))
But how do you plan, prepare, and execute an outdoor trip in the dead of winter well below freezing weather?
Enter director of product development at Beyond: Nathan Jenkin, a 20-year avid outdoorsman with multiple arctic trips under his belt, who will lead me, a cold weather novice, to test our gear in its intended environment to fully understand how it functions, its potential limitations, and what modifications can be made to meet to not just meet the Beyond ECW customers needs, but ensure they are comfortable even in the harshest of environments.
 Above: Director of Product Nathan Jenkin in his comfort zone. In the shop, tinkering, visualizing, and creating.
Preparing for the Trip
Winter weather is harsh, unforgiving, and can quickly turn deadly. While the average temperature for January in Bemidji, MN is 2.6°F, we were lucky enough to experience a more extreme average of -14°F, with a wind chill of -26°F. Proper preparation is a must before venturing out into conditions like that.
"I can’t imagine how different this trip would have been without the Beyond Warmfoot Overboots. Throughout the trip we tested two different builds for the overboot—one of each foot. On my right foot, the boot contained an extra foam insulated insert positioned on the lace line and over my toe. With the naked eye, it’s difficult to notice the difference between the two, but in -26°F wind chill you feel the contrast. I also wore two pairs of socks and a standard waterproof boot beneath. The Overboots slide on and off with ease and remain secure by using a hook and loop system in the front. They are ultra-lightweight and compress easily for packing."
Pro tip: While in your tent, remove your standard waterproof to allow them to dry out, and throw the Warmfoot Overboots back on over a dry pair of socks to keep your feet extra warm and comfortable while inside.
Below: First generation prototypes of the Warmfoot Overboots and ArcticGate Mitts.
Step 1. Choose your equipment and gather your provisions: Make sure you have the proper equipment. Select easy-to-open, high-calorie foods.
Below: Layering system Trial Run 1

Above: Assortment of items used for the trip.
Step 2. Create a layering system: Create your clothing layering system to meet the needs of your environment and try it on. You’ll quickly understand how challenging a typical layering system for an ECW environment can be for regular movements. (Think Randy from A Christmas Story)
For this trip, my system included three sets of Beyond Baselayers. Practice taking your system on and off. If you’re unsure what the right combination is for your environment, send us an email at connect@beyondclothing.com.
Step 3. Modify your gear: For this trip, we modified gear by extending our zipper pulls to ensure we were able to easily close and open gear with two layers of gloves on. Turns out it’s really difficult to grab a pull tab wearing two layers of mitts. Pro Tip: Check that you can open and close all your containers with your mitts on. Duct Tape can add additional grip to thermos’ and containers where needed for easier access while wearing mitts.
Step 4. Itemize and organize gear: Practice packing all your gear in the bag you’re taking. Make sure everything fits in your gear bag in the order you will need to access it.
Trial Run: Part 1:While inside and wearing your layering system, practice setting up your tent, getting into your sleeping system, prepping your food, changing inside your sleeping system, peeing in a bottle, etc. Get used to the motions and movements you will be doing on your adventure in the layering system you will be wearing.
Part 2:Test your gear in the elements you’re going to be in with a safe fallback plan. Essentially, do the same thing you did in Part 1 of the trial run, but outside in the weather, with a safe space to warm up inside nearby.
Now you’re ready to [finally] hit the road…or ice
Let’s dive into my experience(s).
Day 1 + 2:
We set out from Beyond’s native land of Seattle, taking a red eye to Minneapolis, MN. After a two-hour layover, we hop on the plane to Bemidji, MN. As our plane lands in Bemidji, where the expected high for the day is -1°F, the flight attendant welcomes us over the intercom, letting us know the current temperature is -11°F, so we might want to zip up our jackets. The doors to the cabin open and a chill rapidly spreads throughout the entire cabin. I immediately regret not having baselayers on and my ears uncovered (rookie mistake). We pick up our rental car and head to purchase white gas specifically made for camping, and a much-needed second breakfast. Each time we get in and out of the car while completing our errands my feet and ears are brutalized by the cold. After completing our errands in town, we are off to our AirBnB on Lake Bemidji, which will serve as our home base for the next two days as we undergo our second trial run, and finalize our preparations. The second trial run period is crucial to test gear and layering systems directly in the ECW environment while still having a safe, indoor space to access quickly if needed.
Once we arrive at the AirBnB, we layer up in the comfort of the great, warm indoors and head for some cross-country skiing on Lake Bemidji, to familiarize ourselves with the landscape, acclimate to the weather and the process of taking the skis on and off while in our full layering system on the ice. At first, getting balance is a bit tricky, but I get the skis under me and away we go. I was able to quickly get the feel for the Ski Skins we had screwed into our skis.
 Above: First generation prototypes of the Warmfoot Overboot attached Asnes Combat Nato Skis.
I thought we were going to go a few hundred yards to check the gear and come right back, but I was wrong. We ended up skiing down onto the lake, about 2 miles each way. The sunset was gorgeous! To see it, I take off the fog-filled goggles. The reflection of the snow-covered frozen lake hits my skin, feeling the cold of the air at the same time as the warmth of the reflection of the sun. To my surprise, my hands, feet, and body feel good—maybe too good. I begin to feel the sweat starting to build up, and I realize I’ve overdressed.
 Above: First time on the Asnes Combat Nato Skis and 120 bindings headed to the ice while testing prototypes of the Warmfoot Overboot, ArcticGate Mitts, Liner Gloves, Mountain Jager Jacket, NewWinter Neck Tube(s) and ECW Wool Beanie. I am also wearing 3 Layers of the Bask Baselayers, Ascent-Pants, Arx 2.0 Rain Jacket and the Arx 2.0 Rain Pants.
This first foray into the cold serves as both a confidence booster and a crucial learning experience for this first-time ECW adventurer. Knowing and experiencing that I could be on the lake for 4 plus hours in -10°F and be comfortable was a massive win. There is a real art to balancing physical exertion and layers. When we arrive back to the warmth of the AirBnB, I chat with Nathan about the experience over dinner and we decide on adjustments to make to my kit based on the day's excursion.
Key takeaways:
- Manage exertion to reduce the risk of overheating. Move slower than you want to.
- Reduce layers
- Opt for less insulation while moving
- Remove hard shell tops and bottoms (these are mostly for wind management)
Day 3:
Early in the morning, we grab a quick breakfast and get started on our meal prep. Check out the Shopping list above. This takes longer than expected, which I’m starting to grasp is the case for everything when you’re in below-freezing conditions. Details matter. Laying all of your items out on the table is a good way to visualize what each day's worth of food will include. Sort and pack.
Key takeaways:
- Pack high-calorie, low-bulk, ready-to-eat foods
- Chocolate and butter are recommended to have on hand to enhance meals and add some additional calories to your diet

Above: Meal prepping.
For lunch, we decided to test out some of the soup packets we’d packed. This gives us a good idea of what we will be eating on the ice over the coming days. We heat the soup, which is loaded with extra butter. But this isn’t just any taste test. It is a test run of how difficult it will be to open the lid of our soup containers and thermos while wearing our gloves and mitts. We apply duct tape to add extra grip to the slick lids. After successfully opening the soup lid, down goes the butter goodness.
Following lunch we are ready to jump into our MSR Stove testing, in the Airbnb, on the kitchen floor, using white gas. At this point, it’s important to note that it is not advised and it is extremely unsafe to use an MSR Stove indoors. For our brief test, we diligently monitored our Co2 meters and a thermometer to ensure our safety. When you’re on the ice, in the elements, the MSR Stove is the only source of heat you have and will be used inside the tent along with proper Co2 monitors for safety. We must both be able to quickly and safely operate the stove in case of an emergency.
The stove won’t just be used for warmth, but also to melt snow and provide water. Check out How to Purify Water in the Wilderness. A modified base is extremely convenient for moving the stove around more easily with mitts.
Below: MSR Stove with modified board base, melting snow as a water source.
Unfortunately, part of our stove broke during the test, forcing us to make a trip to town for a replacement. Another example of why testing your gear is so important before you are out in the elements. Getting a replacement stove pushes back our schedule a day.
Day 4:
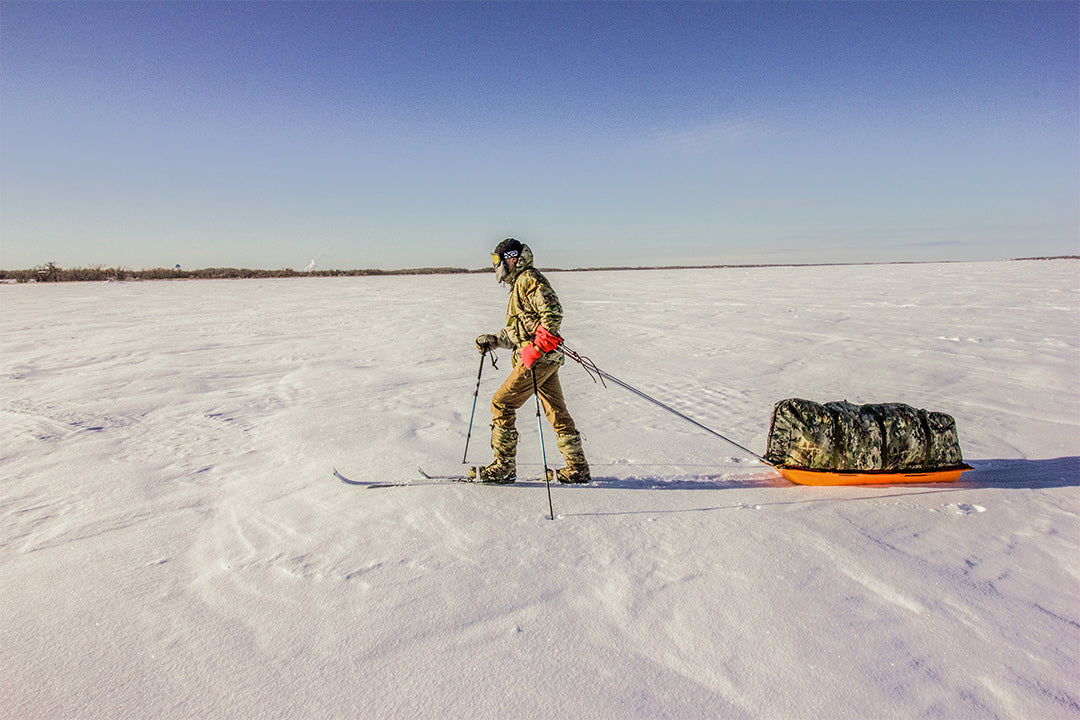
Waking at 5:00 am, we finish prepping our packs, organizing each stuff sack, and methodically loading our sleds. After two days of preparing, we head out onto the lake in cross-country skis, pulling our gear on sleds behind.
(Note* These sleds are fully customized, made specifically for this trip, if you are an arctic explorer and would like PDF instructions please reach out to Connect@beyondclothing.)
 Above: Nathan Cross Country Skiing while testing prototypes of the Warmfoot Overboot, ArcticGate Parka, NewWinter Neck Tube(s), Liner Gloves, ArciteGate Mitts and the ECW Wool Beanie. He is also wearing 3 layers of the A1 Aether Baselayers and A5 Rig light Pants.
We scout a spot to lay camp for the night. We’re about half a mile out on the ice, but can still see cabins distantly on the shoreline. Our goal was to be able to set the tent up in 2 minutes or less, which is no easy task while fighting against the wind. In ECW, wind is the enemy, and increases the risk of losing a piece of equipment. To ensure this doesn’t happen to us, we follow a strict order of operations for tent setup. We’ll dive into the nuances of setting the tent up in a later post, and for now, keep it at a high level.
This was my first time experiencing this level of cold while mostly static. The tent set up takes us 20 minutes plus—not ideal. We set up and take down the tent 5-6 times, each time we get better at it. This puts the use of mitts into perspective. I learned that I can pull my hand out of the mitt and use the fleece-lined hand for the tasks requiring fine motor skills, but only for a short period before the cold starts to creep through my fingers. The mitts become somewhat of a security blanket for me throughout the trip.
 Above: Arctic Tent set into the ice using the sharp ice screws with the custom sleds and sleeping system in the background. Oh the luxury of a day without wind!
With the tent set up and our sleeping systems safe and dry inside, we head back to the security of the cabin to make our bird beaks. Leaving our tent set up and letting out sleeping bags cool, as if they were in our sled all day.
Key Takeaways:
- Active vs Static
- Mitts are my lifeline (a new love for Gore-Tex Lab Windstopper®)
- Don’t let the ice screws freeze
Once back inside I am reintroduced to the art of sewing. Nathan instructs how to make a Bird Beak out of two layers of fabric sewn together. Using a simple stitch, I sew the pieces together, connecting the two pieces of fabric to the foam layer on our goggles. This ends up taking close to 5 hours, which is a luxury while you’re in the field. Throughout the sewing process, it becomes clear to me that by creating the Bird Beak we’re not just taking on a sewing project, but creating a crucial piece of gear for our experience and providing me with another crucial tool in the ECW tackle box. Nathan explains potential scenarios in which the simple stitch could be a literal lifesaver. What stands out to me most is its use for tent repair. The ice screws for the tent are extremely sharp and can pierce tent fabric, leading to a tear that exposes you to the elements. From this point on in our trip, I make sure I have a thread and needle on me at all times. If you want to participate in a world of outdoors, onsite gear repair is a must-know-how. We finish up and head out for dinner.
 Above: Me working hard on the Bird Beak.
Below: Nathan holding a cardboard template of his Bird Beak up to his goggles.
Key Takeaways:
- Learn to sew
- Keep a needle and thread on hand at all times
- Sewing may not be fun, but it is a necessity
After we complete our Bird Beaks, we eat dinner and boil water to put in our water bottles. This is a little cheat for our first night to stay warm in our sleeping bag. See, when you’re in well-below-freezing weather, your water bottles have to stay in your sleeping bag throughout the night to keep them from freezing over. Throughout the night, your body heat prevents the ice from building up, keeping the water drinkable. By boiling the water for bottles we’re ensuring at least one night of warmth. We load up the sleds gear up and head down to the campsite for the night. Before we head out, I check the temperature which is hovering at -15°F—COLD.
In the pitch dark, we work our way down to the campsite by the light of the moon and stars. It is somewhat surreal. As soon as we get to the tent, and start to load in, the space quickly closes in on me. “We are sleeping in this?” I have a panic attack. (A Trail Run: Part 1 would prevent this situation.) First time experiencing that. I was so flustered I tried to get into the tent backward! Pretty comical looking back. Even Nathan admits that the tent is smaller than expected. He calms me down and helps me get into my sleeping bag. I have never been so cramped before. There isn’t an inch to move, and with the three baselayers, I feel like I am in a straight jacket. I situate the recently boiled bottles of water between my legs and start to feel my body retain its warmth. I slowly feel myself starting to relax and settle in, and Nathan and I chat for a bit.
Being the seasoned ECW guide that he is Nathan is asleep and snoring in seconds, and I mean out cold—pun intended. After 20 minutes of trying to fall asleep, I begin to warm up again (I’m a hot sleeper). It happens quickly and is overwhelming. Beneath three sleeping bags, I started struggling with the zippers. (Again, a Trail Run: Part 1 would prevent this situation.) I would know where each zipper is on each bag. After a few minutes of unsuccessfully fiddling with the zippers, I opt for shifting the bottles of warm water away from my legs which provides some relief.
Twenty more minutes go by, and I’m warming up once again. This time I start worrying about sweating inside the bag. Once your sleeping bag is wet, from either sweating or condensation due to breathing into it, it could potentially freeze. This is not only a miserable experience but it is potentially dangerous. I once again begin struggling with the zippers of my sleeping bags, in search of some relief. I discovered the second bag is a “cross zip”. This is the problem. I begin to sit up, before remembering that the size of the tent means I’m unable to. I start taking off one of my top baselayers, which are tucked into Bask Long Johns. Initially, the baselayers want to stay together, as they should, but I fight them long enough to be able to peel the top piece off. Next, I work on a layer of the Bask Long Johns. Going one leg at a time, I successfully remove two pairs and begin to feel relief as my body cools down. I remember it is -15°F outside, and proceed to spend the next 10 hours staring at the slow freezing tent wall, 10 inches from my face trying to sleep while listening to the songs of the ice.
Key Takeaways:
- Trial run laying in your with all bags inside
- Trial run your sleeping system
- 3 layers of sleeping bags and a bivy sack
- Do Not Breathe into your sleeping system
- Trial run changing inside your sleeping system
- I’m not a big fan of being in the tent
Day 5 - First morning in the tent:
Time to get up. Being in the tent all night has led to a layer of ice forming in the tent from the condensation of our breath. Every small movement we undertake knocks a bit of ice off, causing it to fall—not a big deal so long as my sleeping bags are protected in a bivy sack. It’s time for a nice morning piss. In ECW, that means the following: peeing into a bottle while you’re in the warmth of your three layers of sleeping bags, then proceeding to empty that bottle into a hole—the pee hole. It’s gross but necessary. When setting up the tent, we dug a pee hole in the vestibule of the tent. Don’t confuse this with your snow gathering hole for water.
Next, it’s time to clean the ice out of the tent. In this environment, anything that is wet will eventually freeze, and moisture can kill. Before deicing the tent, it’s crucial to make sure all of your clothing is in a stuff sack or protected in your bivy. Remember, it is -15°F outside. Using a 5-inch brush on the ceiling and walls, we brush all the ice. It seems to take forever and falls all over the bivy. We brush as much as we can off our bivys and stuff sacks and onto the floor. We then get out of the sleeping bags and throw everything into the vestibule, making sure not to drop or drag things across our pee hole as we do so. Once you remove the sleeping pads from the floor you can feel the ice beneath your knees, which leads to sweeping the remaining ice up as quickly as you can. We use the collected ice to cover the pee hole. (I would suggest a bigger broom and 2 of them if possible.) Once the tent is cleared of ice, it’s time to test the stove in the tent.
Below: First time testing the MSR Stove with modified board base in the vestibule.
Key Takeaways:
- Line the edge of the tent with your stow packs
- Keep an extra hardshell close for frost cleaning(this is done first thing)
- Pack a normal-sized brush for frost sweeping
- Don’t confuse clean water side and pee side
Conclusion
Following this trial run, we pack up and drive to our next location—Lake of the Woods, Minnesota. Lake of the Woods is what we refer to as the final boss. This time, there is no Airbnb to fall back to, so we designate the rental car as our fallback. We follow our setup routine for the camp.
The hardest part of the trip? Knowing when to tap out. I’m the kind of person who believes in testing my limits. But part of testing your limits is defining what they are, realizing when you have breached them, and knowing when you have gone far past the point of simply pushing yourself, and have made it well beyond the point of health and safety. On the ice, there is no room for ego, power tripping, or any semblance of a sense of control.
I successfully stayed out on the ice one last night, and Nathan completed two additional nights. Each morning while Nathan was out on the ice, I would wait at a nearby coffee shop for his text to confirm he was ready for company, then load up the sled and meet him 2 miles out on the ice. Nathan was preparing for a second trip, heading to the Arctic Circle. One night was particularly brutal, -29°F with wind gusts up to 26 mph.
Below: Me enjoying the warmest part of the day. I really wish I had the ArcticGate on the left.
Below: ArcticGate teaser image. Notice the full facial coverage and ergonomic easyfind zipper pulls. Ready to take on -50 °F
Beyond Clothing’s real-life, in-depth experience gives us full confidence in the products we provide our customers for ECW environments. Our experience in Minnesota helped us create products for real people, in real situations and gave us the necessary insight for the adjustments to create what we consider to be the best ECW system on the planet. Every minor detail and adjustment made to our gear as a result of this experience saves time for our customers, and Every Second Matters.
For group orders of the ArcticGate Collection please contact Connect@beyondclothing.

![Above: By Photo by Corporal Peter McDonald, USMC - [1] (originally uploaded to en.wiki by Raul654), Public Domain, https://commons.wikimedia.org/w/index.php?curid=403277"](http://beyondclothing.com/cdn/shop/articles/Picture2_30e0ad61-2970-45f8-9250-b9d8759c7f8d.jpg?v=1784152778&width=533)

1 Comment
Great article full of life saving tips on how to survive in negative degree weather and fantastic gear that will help you along the way. Much respect for going the extra mile on testing your product out!